
If your fascia is soft, spongy, or pulling away from the roofline, remove the rotted section, correct the water source behind it (usually gutters or drip edge), and rebuild with a rot-resistant board. That’s the whole job in one sentence. A single-story run with safe ladder access is a reasonable DIY project for someone comfortable with a saw and a pry bar. Anything involving soft rafter tails, two-story access, or a steep pitch is a job for a licensed roofer.
TL;DR:
- Fascia rot is caused by persistent water exposure usually due to clogged gutters, missing drip edge, or damaged shingles, not the wood itself deteriorating on its own.
- Diagnosing rot requires probing with an awl or screwdriver along the fascia and inspecting behind gutters and around rafter tails to determine if framing repair is necessary.
- Replacing rotten fascia involves careful sequence steps, including gutter removal, fascia extraction, sub-fascia inspection, and prime-all sides treatment for wood durability.
- Working on the roof edge beyond a low-slope single story requires professional help, especially for steep pitches or multi-story homes, due to safety and structural complexity.
- Fascia replacement costs range from $6 to $20 per linear foot, with additional expenses for gutter repairs and inspection, and hewing to water source fixes prevents recurring rot.
Table of Contents
- Tools and Materials for Fascia Board Rot Repair
- How Do You Confirm Fascia Board Rot?
- Why Is My Fascia Board Rotting?
- Removing Rotted Fascia and Installing a Replacement
- When to Patch and When to Call a Professional
- Best Materials for Fascia Repair: Wood, PVC, and Fiber Cement
- Fascia Board Replacement Cost and Timeline
- Preventing Fascia Board Decay: A Maintenance Checklist
- A Contractor’s Take on Fascia Repair
- Get a Professional Fascia and Roof Edge Inspection
- Sources
- FAQ
Tools and Materials for Fascia Board Rot Repair
Before you touch a pry bar, get the safety setup right. Fascia work happens at the roofline, which means ladder stability matters more than any tool in your bag. Use a properly footed extension ladder, have a second person spot it, and never lean sideways past the rail to reach a far section. Two-story homes or anything above a single low-slope roof edge should go to a professional, full stop.
For the job itself, you’ll want:
- A flat pry bar and a smaller cat’s paw for stubborn nails
- An oscillating multi-tool for cutting fasteners flush without damaging soffit or trim
- A circular saw or miter saw for cutting replacement boards to length
- A cordless drill/driver plus a stud finder or rafter locator
- A tape measure, chalk line, and a screwdriver or awl for probing suspect wood
Materials depend on what you choose to install: primed cedar or pine, pressure-treated lumber, PVC trim board, or fiber cement. Stock up on galvanized or stainless fasteners matched to your material, exterior caulk, wood primer if you’re going with wood, and safety glasses and gloves.
How Do You Confirm Fascia Board Rot?
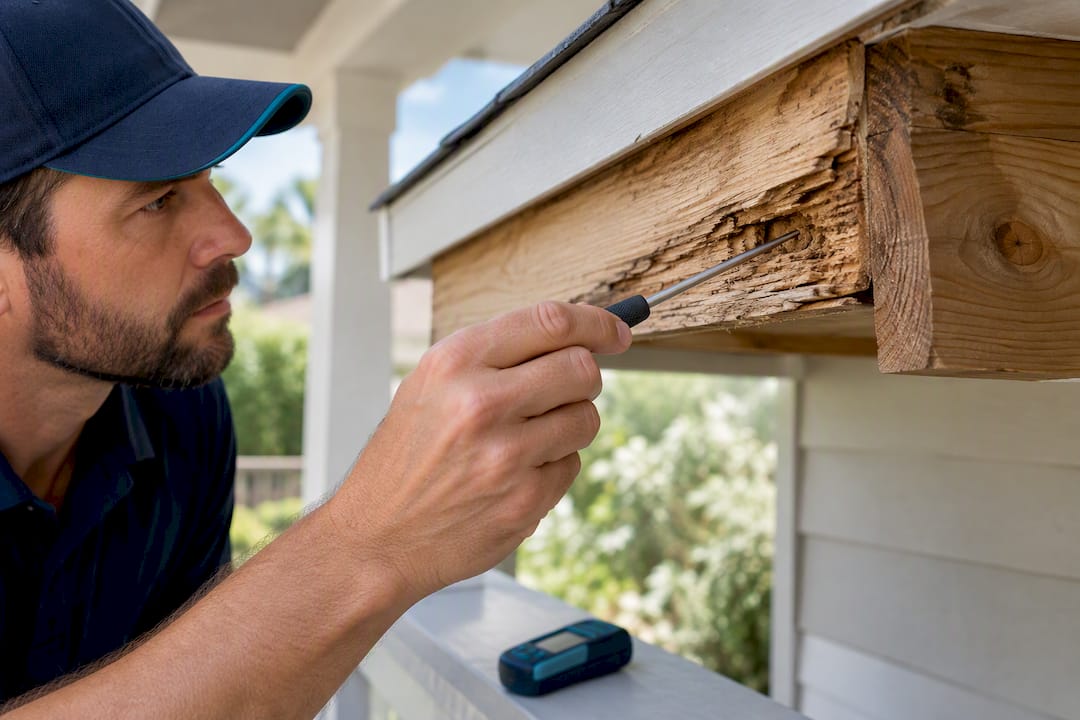
A screwdriver or awl tells you more than your eyes ever will. Press the tip into the board at several spots along the run. Sound wood resists; rotted wood gives way with little pressure, sometimes crumbling like wet cardboard. Do this test even on boards that look fine from the ground, since paint can hide a lot of decay underneath.
Work through the inspection in this order:
- Scan visually first. Look for peeling paint, dark staining, warping, or gaps where the fascia has pulled away from the sub-fascia.
- Probe every few feet. Soft spots rarely stay isolated. Check both the face and the bottom edge where water pools longest.
- Pull a short gutter section. Detaching a few feet of gutter exposes the backside of the fascia, where rot usually starts and where paint never gets applied in the first place.
- Mark the damage. Use painter’s tape or chalk to flag where rot starts and stops so you know exactly how many linear feet need replacement before you buy lumber.
- Check the rafter tails. Wherever the fascia is soft, probe the wood behind it. Contractors map moisture and inspect rafter tails before doing anything else, because nailing new fascia to a rotted rafter tail gives you nothing to fasten to.
Pro Tip: Don’t stop probing at the first solid spot you find. Rot often travels a foot or two past where it’s visible, especially behind gutter hangers where wood stays damp longest.
If the sub-fascia or rafter tails feel spongy or delaminated, your scope just changed from a cosmetic fix to a framing repair. That’s the point where a lot of DIY projects should pause and get a second opinion.
Why Is My Fascia Board Rotting?
Fascia doesn’t rot on its own. Something is dumping water on it repeatedly, and until you find that source, any new board you install is on borrowed time. Fascia rot is almost always a symptom of a water-management problem somewhere else on the roof edge, not a defect in the wood itself.
Check these culprits in order:
- Clogged or sagging gutters. Debris holds water against the fascia for days after every rain, and gutters hung with the wrong slope or worn-out hangers make it worse.
- Missing or damaged drip edge. Without it, water sheets directly off the shingles and down the face of the fascia instead of into the gutter.
- Damaged bottom-course shingles. Cracked or lifted shingles at the roof edge redirect runoff exactly where you don’t want it.
- Attic condensation. Poor ventilation can push moisture into the wood from the inside, which is why a soft fascia paired with musty attic air or visible mold on rafters deserves a look inside the attic, not just outside on the ladder.
Fix the cause before you cut a single board. Skipping this step is the single most common reason a “repaired” fascia rots again within a few years.
Removing Rotted Fascia and Installing a Replacement
This is the part where sequence matters. Skip a step or do them out of order and you’ll either damage good trim or end up fighting your own gutters.
- Protect the work area. Lay a tarp below to catch debris and old fasteners, and confirm your ladder setup or scaffold is stable before you start removing anything.
- Detach the gutter. Unscrew hangers and lower the gutter run carefully, or remove it entirely if the damaged section runs its full length.
- Pull the drip edge. It usually lifts with a flat pry bar once the fasteners are cut or backed out.
- Remove the damaged fascia. Cut nails flush with an oscillating tool where prying would tear into the soffit, then work the board free in sections rather than one long piece. Removing damaged fascia carefully protects the soffit panel underneath, which is far more annoying to replace than the fascia itself.
- Inspect the sub-fascia and rafter tails. Probe every exposed rafter tail with your awl. Soft or delaminated wood needs sistering (bolting a new piece of lumber alongside the damaged section) or full reframing before you go any further. Skipping this is how homeowners end up with a beautiful new board fastened to nothing.
- Measure and cut the replacement. Measure twice, cut once, and add a small gap (roughly an eighth of an inch) between board ends to allow for expansion.
- Prime unfinished faces. If you’re using wood, prime and paint all six sides before installation, including the back that will be hidden against the rafter tails. This single step is the one most DIYers skip, and it’s the reason so many wood fascia repairs fail again within five years.
- Fasten the new board. Use corrosion-resistant nails or screws spaced roughly every 16 inches into solid framing, matching fastener type to the treatment chemical if you’re using pressure-treated lumber.
- Caulk the seams. Run a bead of quality exterior caulk along top and bottom edges and any butt joints before painting.
- Reinstall drip edge, then gutters. Drip edge goes back first, tucked under the roofing membrane and over the new fascia, followed by the gutter and hangers.
Pro Tip: Reinstall the drip edge so it overlaps the fascia by at least an inch and slopes water away from the wood. A drip edge installed flush or reversed is almost as bad as having none at all.
When to Patch and When to Call a Professional
Small, shallow rot in a single spot doesn’t always require a full board swap. A wood hardener followed by two-part epoxy filler can stabilize minor surface decay and hold up for years, but only when the rot hasn’t reached the rafter tail and the surrounding wood is still sound.
Call a licensed roofer when you see any of these:
- Rot extends more than a few feet along the run or shows up in multiple spots
- The fascia carries the weight of your gutters and feels loose or bouncy underfoot when you press on it
- Rafter tails probe soft, meaning the repair now involves structural framing
- The work requires a second story, steep pitch, or ladder placement you’re not confident in
A solid inspection from a pro should include a written scope of the damage, photos of the affected rafter tails, and a clear breakdown of what’s cosmetic versus structural before any roof repair begins.
Best Materials for Fascia Repair: Wood, PVC, and Fiber Cement
Your material choice changes both the upfront cost and how often you’ll be back up on that ladder.
- Primed wood (cedar or pine): Cheapest option initially, but it needs paint maintenance every few years and is the material most prone to rot if you skip priming all six sides before install.
- Pressure-treated lumber: More rot-resistant than raw wood, but it demands fasteners rated for the specific treatment chemical, since standard galvanized hardware can corrode against it.
- PVC trim board: Immune to rot entirely and holds paint or comes pre-finished, though PVC requires specialty installation techniques around expansion gaps and trim detail that inexperienced installers sometimes get wrong.
- Fiber cement: Extremely durable and low-maintenance, with better fire resistance than wood, though it’s heavier to handle and cuts require dust control.
If you live somewhere humid or you’d rather not repaint every few years, PVC or fiber cement earns back its higher price in reduced upkeep. If budget is tight and you’re willing to stay on top of paint, primed wood still works fine.
Fascia Board Replacement Cost and Timeline
Expect labor for fascia replacement to run $6 to $20 per linear foot, with material choice driving most of the swing. Related work adds up fast: removing old fascia typically costs $3 to $7 per linear foot on top of that, and a full roof inspection runs about $125 to $135 if you want a professional to check rafter tails and roof edge condition first.
By the Numbers: Gutter repair tied to fascia work runs $194 to $620, while full gutter replacement lands between $1,600 and $2,175. Those add-ons often cost more than the fascia board itself.
A single-run DIY repair, say 20 to 30 linear feet with no rafter damage, typically takes a weekend. Add hidden rafter or soffit rot and that timeline stretches to several days, since sistering framing and letting caulk or primer cure properly can’t be rushed. Multi-story or whole-house jobs are a professional’s territory and usually run several days to a week depending on scope.
Preventing Fascia Board Decay: A Maintenance Checklist
Fascia rot is almost always preventable. Gutter maintenance is the single biggest lever you have, since clogged or improperly sloped gutters are the most common cause of repeat failures.
- Clean gutters twice a year, spring and fall, more often if you’re under oak or pine trees.
- Check gutter slope and hangers annually. Water should drain toward downspouts, not pool in the middle of a run.
- Inspect drip edge and flashing every year, looking for lifted edges or gaps where water can get behind the fascia.
- Touch up paint or caulk every two to three years on wood fascia, especially on south and west-facing runs that take the most sun damage.
- Check attic ventilation if you notice consistent moisture or musty smells, since soffit ventilation issues can push condensation into fascia from behind.
- Schedule a professional roof inspection every few years, or sooner after a major storm, to catch rafter tail damage before it spreads.
Pro Tip: Walk your gutter line right after a heavy rain and look for water sheeting over the front edge instead of draining through downspouts. That’s an early clog warning before any wood damage shows up.
A Contractor’s Take on Fascia Repair
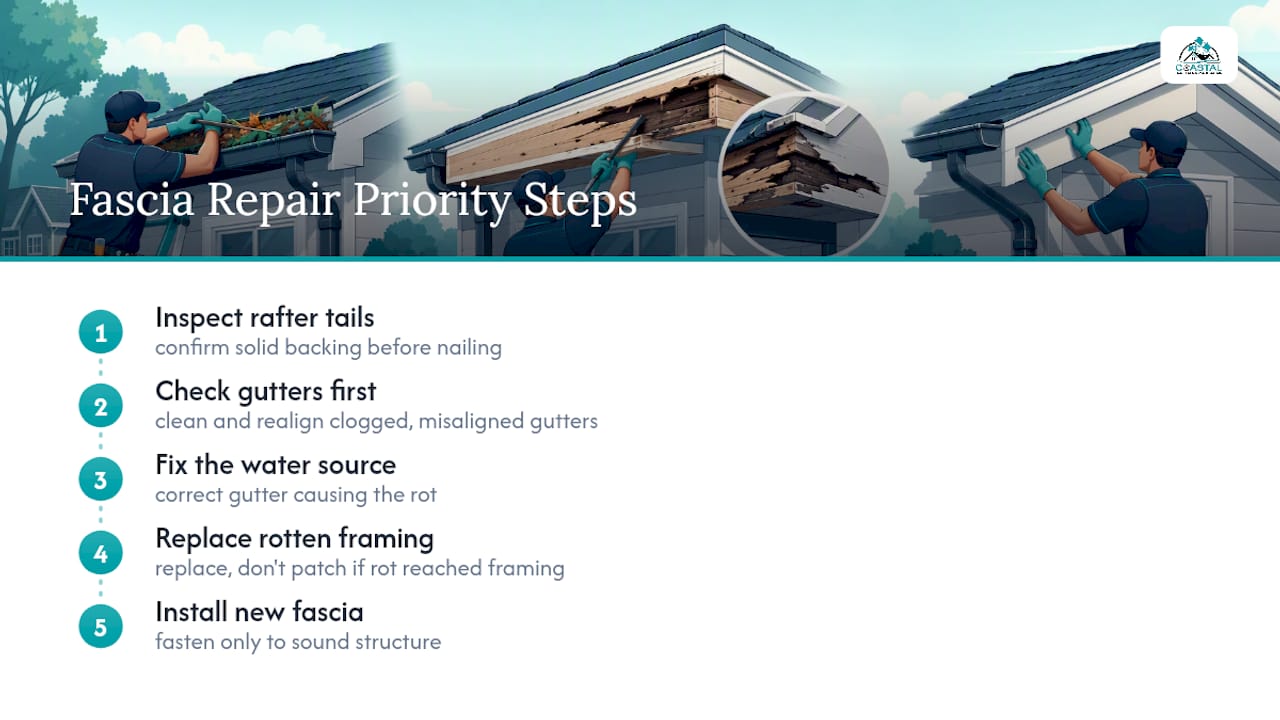
I’ve seen more failed fascia repairs caused by skipped steps than by bad materials. The most common mistake isn’t picking the wrong board, it’s nailing a new one to a rafter tail nobody bothered to check. A repair that looks perfect from the driveway can be fastened to mush behind the trim.
The other gap I see constantly: homeowners fix the fascia and never touch the gutter that caused the problem, a key aspect covered in our roofer SEO plan to win the map pack. New wood against the same clogged, misaligned gutter just buys you a few more years before the next repair. When Coastal Roofing & Construction gets called out for a “second” fascia repair on the same run, the water source almost always got missed the first time. Replace, don’t patch, whenever rot has reached framing. Everything else is optional; that part isn’t.
— Ryan
Get a Professional Fascia and Roof Edge Inspection
A professional roofing crew often checks the roof edge, rafter tails, and gutters together instead of treating fascia as an isolated cosmetic fix. The team may be trained through partnerships with Owens Corning, GAF, and Tri County Metals, so a fascia call can often turn into a full roof-edge assessment.

Our soffit and fascia installation service covers everything from rot removal through drip edge and gutter reinstallation, and if the inspection turns up shingle or flashing damage feeding the rot, that gets flagged during the same visit rather than after a second callback. For homeowners weighing DIY against a licensed crew, our breakdown of soffit and fascia cost ranges for Tampa Bay is worth a look before you commit to a ladder and a Saturday. If your fascia sits above a second story, has multiple soft spots, or you’d simply rather not find out mid-project that the rafter tails need sistering, request an inspection through our roof repair page and we’ll give you a clear scope before any work starts.
Sources
- How to Replace Fascia Boards: A Step-by-Step Guide
- Fascia Board Repair 101: Your Ultimate Guide
- Rotting Fascia Boards
FAQ
What Can I Do to Fix Rotting Fascia Boards?
Remove the rotted section, fix whatever is causing the moisture (usually clogged gutters or missing drip edge), then install a replacement board matched to your climate and maintenance preference. Small, shallow rot can sometimes be stabilized with wood hardener and epoxy filler instead of a full replacement, but only if the rafter tail underneath is still solid.
How Much Does It Cost to Repair a Rotted Fascia Board?
Labor for fascia replacement typically runs $6 to $20 per linear foot, with removal of the old board adding $3 to $7 per foot. Gutter repair tied to the same job often costs $194 to $620, so total price depends heavily on how much related damage the inspection turns up. Coastal Roofing & Construction provides exact pricing after an on-site inspection through its services page.
Why Is My Fascia Board Rotting?
Fascia almost never rots on its own. It’s a symptom of water sitting against the board from clogged or poorly sloped gutters, missing drip edge, or damaged shingles at the roof’s bottom edge. Fixing the fascia without correcting the water source usually means the rot comes back within a few years.
What Happens If Fascia Rots?
Untreated fascia rot spreads to the sub-fascia and eventually the rafter tails, which support the entire roof edge and your gutter system. Once rafter tails go soft, sistering or reframing becomes necessary before any new fascia can be installed, turning a simple board swap into a structural repair.